Summer is finally here which means a little more free time and some extra pep in my step from the weather and sunshine. I'm hoping to make ground on a couple projects. One for fun and another to build off mapping and data visualization and put it all on the web in an interactive format.
Here's a preview of the progress on my current "for fun" project:
Every city is filled with variety and history wherever you look. From the cornices and windows, to architecture, even in something as simple as a sewer cover. After a few weeks of hunting around I've gotten about halfway to my goal of finding between 60 and 100 different sewer covers. When I'm done I'll touch them up and make a few prints of the collage.
One of my favorites that I find pretty frequently is the PTC cover. These are from the pre-Septa days when the Philadelphia Trolley Company was still in town.
Finding the second half will probably be a summer long scavenger hunt but I'll gladly take any excuse to bike around in the sun.
Thursday, May 21, 2015
Monday, January 26, 2015
Site Selection for Heathcare Enrollment Support
(Using ACS Data)
While working with a team in a competition held by the University of Pennsylvania's Fels Institute of Public Policy, we wanted to create a tool that would conduct a site selection analysis to identify a focus area for our submission. Our overall project goal was to develop a strategy that can analyze the healthcare information added recently in the American Community Survey (ACS) and identify a focus area during the following healthcare enrollment period. A tailored approach would then be selected within the area to increase enrollment rates and provide support in picking the best plan for each individual/family. The advantage of developing a tool like this is that it would be cheap to create and implement, and could provide analysis for any town/city/area since it uses ACS data which is standard throughout the country.
We identified 4 factors from the ACS to be used for site selection:
1. Highest total number of households whose incomes were between 138-399% of the federal poverty level.
2. Greatest number of persons within the 25-34 age range as identified on the ACS.
3. High levels of persons employed but without healthcare.
4. High totals of persons whose healthcare is purchased through the public exchanges.
The totals for each factor were divided into thirds and a score of 1 to 3 was assigned to each factor as are illustrated below:
The geographical area used within these factors are the 2010 U.S. Census tracts for Philadelphia. However this approach can be applied to census tracts in other cities and regions as well.
To pick the best particular sites within high scoring areas, the score for each census tract was combined with the scores of its neighbors. Then the total score in a tract was divided by the total number of neighboring tracts to create an average. As a result, a large tract such as the one in the center of Philadelphia that contains the large green swath of Fairmount Park, and neighbors about 20 different census tracts is left with average score comparable to a small tract with only 5 neighbors. The end result of this process will identify the census tracts with a high score that are also surrounded by the best group of other tracts that scored highly as well.
Below are the results of the final site selection analysis:
Based on this site selected we have 2 different approaches:
1. One approach for a small clustered area.
The southern site reflects this type of result. The best approach for signup and advising support in this area may be to open an on-site enrollment station within a library or other public setting. The dense compact geography of this site could thereby be suitable for one central site that people can walk to for one-on-one support.
2. And a different approach for a dispersed geographic region.
The area to the north is fairly large and spread out over a wide area. In this case opening one on-site center may not be the most efficient way to reach our target group. Instead we may look to open a call center (or in an area with high internet usage a website tool with live chat), and mailed materials or flyers that communicate the availability and contact information for our virtual support option.
Starting in 2013 the ACS has added additional questions to its survey to collect data on the availability of internet and computing in households. A selected approach for either dense clustered sites, or more dispersed area could be tailored even further depending on the results of this additional information.
Modeling Assumptions and Groundrules
There were however a few issues and assumptions used with the ACS data. The first to note is the margin of error. The ACS is a statistical survey about a region. In this case the geography is a census tract. However since the surveys have just started and do not have a complete collection of data, the 5 year ACS, may only have information from these questions from within the past 2-3 years. So for example, the count of uninsured persons could be listed as 52 in a tract, but the margin of error may be huge, like +/- 80.
Another assumption used is that the scores were not weighted. The process could be revised for example, to weigh age and income more greatly in the final score than total persons with public healthcare. Instead in this case all of the factors were held equal.
Finally we are assuming that the various pieces of information overlap within the same groups we are attempting to target. For example, we are assuming that separate information about high levels of younger persons overlap with the data indicating a high number of employed persons without healthcare.
We identified 4 factors from the ACS to be used for site selection:
1. Highest total number of households whose incomes were between 138-399% of the federal poverty level.
2. Greatest number of persons within the 25-34 age range as identified on the ACS.
3. High levels of persons employed but without healthcare.
4. High totals of persons whose healthcare is purchased through the public exchanges.
The totals for each factor were divided into thirds and a score of 1 to 3 was assigned to each factor as are illustrated below:
The geographical area used within these factors are the 2010 U.S. Census tracts for Philadelphia. However this approach can be applied to census tracts in other cities and regions as well.
To pick the best particular sites within high scoring areas, the score for each census tract was combined with the scores of its neighbors. Then the total score in a tract was divided by the total number of neighboring tracts to create an average. As a result, a large tract such as the one in the center of Philadelphia that contains the large green swath of Fairmount Park, and neighbors about 20 different census tracts is left with average score comparable to a small tract with only 5 neighbors. The end result of this process will identify the census tracts with a high score that are also surrounded by the best group of other tracts that scored highly as well.
Below are the results of the final site selection analysis:
Based on this site selected we have 2 different approaches:
1. One approach for a small clustered area.
The southern site reflects this type of result. The best approach for signup and advising support in this area may be to open an on-site enrollment station within a library or other public setting. The dense compact geography of this site could thereby be suitable for one central site that people can walk to for one-on-one support.
2. And a different approach for a dispersed geographic region.
The area to the north is fairly large and spread out over a wide area. In this case opening one on-site center may not be the most efficient way to reach our target group. Instead we may look to open a call center (or in an area with high internet usage a website tool with live chat), and mailed materials or flyers that communicate the availability and contact information for our virtual support option.
Starting in 2013 the ACS has added additional questions to its survey to collect data on the availability of internet and computing in households. A selected approach for either dense clustered sites, or more dispersed area could be tailored even further depending on the results of this additional information.
Modeling Assumptions and Groundrules
There were however a few issues and assumptions used with the ACS data. The first to note is the margin of error. The ACS is a statistical survey about a region. In this case the geography is a census tract. However since the surveys have just started and do not have a complete collection of data, the 5 year ACS, may only have information from these questions from within the past 2-3 years. So for example, the count of uninsured persons could be listed as 52 in a tract, but the margin of error may be huge, like +/- 80.
However as the data quality increases over the
next few years, this analysis process will become more effective. Using the data today is also still a good exercise for developing a process and illustrating its usefulness. The goal of this strategy is to use common data that is publicly available from the ACS, that allows for this process to be replicated anywhere within the U.S.
Another assumption used is that the scores were not weighted. The process could be revised for example, to weigh age and income more greatly in the final score than total persons with public healthcare. Instead in this case all of the factors were held equal.
Finally we are assuming that the various pieces of information overlap within the same groups we are attempting to target. For example, we are assuming that separate information about high levels of younger persons overlap with the data indicating a high number of employed persons without healthcare.
(Side Note:
The color selections for the maps were chosen using colorbrewer2.org. A great resource for color palette recommendations.)
Monday, January 12, 2015
Predicting Home Prices Using Multivariate Statistical Analysis
Over the fall I created an OLS regression model as an
exercise in R. The model was built using a
kitchen sink approach where you basically just throw in a ton of variables without any underlying theory and see which are statistically significant. Of course this approach will only give you results based on correlation and without an underlying theory this would not be a good way to create a model for actual prediction in the real world. However it is a great way to practice R and go through the exercise of creating a statistical model.
Most of the variable data, such as demographics and income, was obtained from the most recent census. Home sale prices were geocoded and joined to variable data in GIS often by census tract or distance.
Other variables were also imported through various methods. Examples included geocoded Wikipedia articles obtained through an API, the location of street trees in Philadelphia, voter turnout, and test scores of local schools. A near table was generated in GIS for each home sale price entry that displayed the count and distance of homes from each variable point. So for example, the total number of trees within 100 ft of a home could be calculated and summed.
Below are a few maps, the first of which shows the location of home sale prices used to train and later test the model. The other maps depict some of the variables joined to home sale prices that proved to be statistically significant within the model.
As you might have guessed, I found that the distance of a home from
Wikipedia articles did not happen to be a significant predictor of home sale prices. However
voter turnout in an area was a significant factor. The total number of votes explains something about the
value of homes in an area different from all the other qualities. Surprisingly, although trees are said to improve the value of a home or block, the model did not identify this variable as being statistically significant.
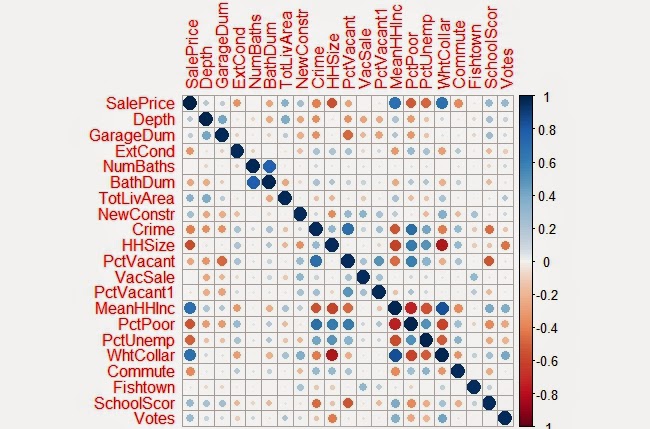
Below is a correlation matrix that can be used to visualize
the relationship of each of the significant variables I identified in my final model
with Sale Price:
The resulting the model accurately predicted the sampled home sale prices 52% of the time. When tested with the cross validation tool, which removes a random sample of data the accuracy rate was sustained. Summaries of both are show below.
![]() |
Observed vs Predicted Values |
As another exercise to evaluate the residuals in the model a few more charts were created below:
![]() |
Above: Residuals versus Predicted Values |
![]() |
Above: Residuals versus Observed Values |
It should be noted that home prices over $1 million were excluded from the data within the model . Excluding these outliers made it easier to evaluate
the plotted residuals contained within the appendices. It was also easier to predict home sale
prices overall as these high dollar value sales skewed the model for the rest of the data.
After the model was completed the residual errors were mapped out in GIS
and ran through the Moran’s I tool in ArcMap to determine whether they were clustered, in
which case another variable probably existed that could improve the model, or
if the errors were dispersed randomly across the city.
![]() |
The map above is useful to just visualize the spatial arrangement of residuals. As later confirmed by the Moran's I test, residual errors were not significantly clustered or dispersed. |
![]() |
Shown are the output results from the Moran's I tool. As shown, the model's residual errors are spatially random.
Here is one more map the depicts the values predicted within a test set. If you are familiar with Philadelphia, you'll notice that the higher home values in dark blue, correlate with Center City and Chestnut Hill. Both of which are desirable areas to live. The areas in red also do correspond with lower income neighborhoods such as North Philly and areas of Southwest and West Philadelphia.
Saturday, January 10, 2015
Petty Island - The 2015 Better Philadelphia Competition
During the
fall of 2014 I joined a team to compete in The 2014 Better Philadelphia Design Competition. The completion was hosted
by the Philadelphia Center for Architecture and founded in 2006 in memory of Ed
Bacon. The subject of this year’s
competition was a reimagining of the future of Petty Island and the
neighboring Philadelphia coastline to the north. (See below for a map of the official
boundaries.) The competition called for
the following elements to be included in design proposals: Site Programming,
Climate Change, Transportation & Access, and Environmental Sustainability.
Petty Island is a small land mass just north of the Camden on the Delaware River. It is thought to be the place where Captain
Blackbeard docked when visiting Philadelphia.
It served as a haven of scum and villainy outside of the privy of the
Quaker ruled city and hosted unsavory activities such as gambling, dueling,
and slave trade during the 18th century. The City Paper had a pretty fascinating cover article in 2010 about the history of the island which can be found here.
As the 20th century progressed it eventually came
into the ownership of CITGO, and correspondingly Hugo Chavez and was used for fuel storage. However, in the last couple of decades, the Venezuelan government has been
looking to turn over the land on the condition that an environmental element be
included in future plans.
The island has been a nesting ground for bald eagles have nested on the island. The years of industrial use on the site have left brownfield contaminants and as a result of both of these ecological and industrial factors development of the site is a complicated proposal. As a group we sought to draw on ecology, and industry as the theme characteristic of the area's future.
Our team featured four urban designers and myself. My work on the projected focused on creating base maps in GIS as needed to support various aspects of the design process. and also serve as a subject matter expert on the background of the surrounding area, neighborhoods, political history and landscape, and other local aspects of importance. It was a great opportunity as a non-designer to contribute ideas in the process as well.
Below are a series of base maps I created in support of design efforts.
![]() |
The first of the base maps we needed was a quick map of the buildings or parcels. (Philadelphia provides data on the actual buildings, while NJ/Camden only provided parcel data.) |
![]() |
Our designers also wanted to look at the potential flood plains to incorporate into their design. The map above shows the 100 year floodplain per FEMA. |
![]() |
Finally, we wanted to integrate our site into the existing rail, bike and road transportation infrastructure. |
Petty island holds a couple densely forested areas that have served as bird sanctuaries along the river. We loved the idea of creating 3 different
levels of ecological preservation and divided the island
into 3 areas: The concrete paved areas
would hold most of our structures and programming, the forested areas serve as protected sites and research areas, and the remaining area served as restoration site for some active use and brownfield remediation.
The Philadelphia side of the boundary in our estimation called for a more dense urban development that incorporated ecological features. We felt this would be an appropriate way to develop the Philadelphia portion of the design area that connected the nearby neighborhoods with their waterfront by creating critical mass of residence and commercial uses along the shore.
Of the particular features, we thought that buildings on
petty island constructed of shipping containers would provide a functional advantage since these could be reconfigured regularly to accommodate different programming uses on the site. The aesthetic appeal of this type of building material provided a quality that reflected the industrial
past of the island. The island could house university ecology programs, research and active efforts for remediation.
The Delaware River also happens to be undergoing dredging activities at this time and we discovered from advising with an ecological expert that the dredge spoils could be used to cap
contaminants in the soil. We therefore planned to focus on using this approach to remediate the northeastern shore of the island. Other activities incorporated into the site included a bike path and boardwalk along the perimeter, and a pedestrian bridge that connected the site into the greater context of Camden's bike and rail network. We discussed creative reuse of the storage tanks as a possible graffiti park that could open up the site for a broader array of visitors and artists.
Below is a copy of the final board we submitted to the judges. The board itself was very large so the original file was condensed to allow it to display here without issues.
The top half illustrates the broad design and develop concepts that we held for the sites.
The bottom half of the board illustrates (from left to right) our concept of ecological preservation and a nod to the industrial past of the area. Second it shows the remediation plan which included leveraging dredging activity and the creation of wetlands within the flood plain. Finally we envisioned a research site and programming space within a network of buildings that could be reconfigured based on use.
Saturday, November 1, 2014
Remote Sensing Using Multispectral Analysis
I was pretty stoked to be able to learn how to use remote sensing tools in GIS. To determine the growth in urban land cover, I used multispectral imaging and analysis to compare two images of Mombasa, Kenya from 1992 and 2014.
GIS software can identify urban and non-urban land cover, and combine the two images and measure the growth in urban land cover. Over 12 years the city grew by 86% in land over. According to the Kenya census, the population also doubled from about 460,000 people to a million during that same period.
How does Remote Sensing and Multispectral Mapping actually work? Below is a 3 min video from a guy in a turtleneck explaining it:
Each pixel represents a square area 30m by 30m. The total growth in area therefore can be computed by simply counting the total red (New Urban Growth) and pink (Original Urban Cover) pixels.
Here is a list of all the different band combinations and uses for each.
GIS software can identify urban and non-urban land cover, and combine the two images and measure the growth in urban land cover. Over 12 years the city grew by 86% in land over. According to the Kenya census, the population also doubled from about 460,000 people to a million during that same period.
How does Remote Sensing and Multispectral Mapping actually work? Below is a 3 min video from a guy in a turtleneck explaining it:
GIS software has the ability to identify different patterns of images on maps, and pick our urban land, vegetation, water and other uses. The tools in Arcmap can conduct both supervised and unsupervised classifications. When unsupervised, the tool will basically go through and classify all of the various patterns it finds on its own. Since computers aren't as smart as people on their own as picking out patterns, this can lead to a lot of patterns output and the results might not be very enlightening.
However under a supervised classification you can train GIS by selecting samples of an area that represent the pattern for each type of land cover. So you can select urban and vegetation, water, or desert for example. Now when you run the tool the software will try to match each area to the closest example that you used to train the model (In my example below this is what I did.) The power of this tool is pretty extraordinary if you combine it with machine learning, or other data such as the specific light frequencies available from USGS Landsat data.
USGS satellites have the ability to separate images into various light bands. This is an incredibly useful tool for making patterns of certain features much more pronounced and easy to train a model to identify. Using both visible light, as well as infrared and heat imagery, you can combine different combinations to more clearly identify differentiate objects. Combining two different bands can filter out the shaded side of a hill, and leave a unique signature of the rocks and plants in the area. A false color image can create stark a contrast that delineates urban and non-urban areas. It should be noted that using light frequencies allow for you to filter out shadows and other features and define features clearly.
Each pixel has a value and when you assign a false color (Red, Green, or Blue), that value is represented as a shade of that color. However those number values are real frequencies in the light spectrum across the band selected. If you knew the exact frequency of light reflected from a particular plant, you could use this process to highlight those specifically from everything else including other types of plants in the image.
Below are several false color images of a few combinations that can be created using different bands. Notice how in the first, urban land is green and different geological features are shades of red. The image in the bottom left of the graphic shows different ocean depths and the reef clearly. Each combination of light bands highlights different types of features.
The next images shown are the analysis for the two different time periods. The small images show the satellite image of the bands used (5,4,3) and the large images show the classification of land cover that was completed using image analysis tools in GIS. The area identified in red for 2014 denotes the new urban land cover that grew over that period while the pink areas illustrate the original urban area.
Each pixel represents a square area 30m by 30m. The total growth in area therefore can be computed by simply counting the total red (New Urban Growth) and pink (Original Urban Cover) pixels.
Here is a list of all the different band combinations and uses for each.
Labels:
Africa,
ArcMap,
GIS,
Kenya,
Land Cover,
Remote Sensing,
Urbanization,
USGS
Wednesday, August 13, 2014
Cartodb Test
The image above was a test to try out CartoDB within Blogger. Blogger is pretty restrictive with the active content and compatible plugins. I found that other free javascript plugins like leaflet will not function in Blogger but CartoDB is an option that will work.
The map shown is simply an export of the Democratic Ward Committee Elections data from the previous post. CartoDB offers some simply map options with its free membership.
Hopefully I'll have some time to play around with this tool later and see if there is any additional functionality that can be added.
Wednesday, July 9, 2014
Taking a Look at Philadelphia's Wards
Philadelphia's Wards:
Philadelphia's smallest level of elected offices are its ward leaders. Wards play a principle role during elections as its leaders receive and distribute street money from each party's campaign funds. Ward leaders also perform other roles behind the scenes that allow them to serve vital functions within the political system.
Within each ward are further subdivisions called Ward Divisions. Why is this important? During each primary voters choose who their candidates will be for various offices. However voters also choose their representatives, committee persons, within each ward division. The ward division committees get together before the general election and choose by vote who the leader for that ward will be. Each ward has two ward leaders, one for each party. So if you are a Republican or Democrat, you will elect your own committee person for your party. In 2014 the ward committees were elected in the May primaries and they subsequently elected their leaders for each ward in June of 2014.
How easy is it to get elected as a ward division leader? Sometimes it can be incredibly easy. In the 2014 primary a number of divisions elected a committee person through just 1 vote, that contained a write-in candidate. That's it. One person walked into the polls, wrote their name on a piece of paper and got elected to something.
The second map below tracks those who were elected via write-in. These candidates either wrote themselves in themselves and were elected or had a few others write their names in as well to win.
Below is a map of all the districts and highlighted in red are the ward divisions that elected their leader by just 25 votes or less. If you could grab 25 friends or supporters and walk into a poll on primary day, you'd have a shot at being elected to participate in Philadelphia's political process.
58th ward (in the far northeastern corner of the city boundary) was the leading division that had the most write-ins and 18 out of its 34 divisions elected committee persons with 25 votes or less.
If you wanted to get started with being involved behind the scenes of the Philadelphia political process, grab some friends during the primary and write-yourself in.
Wednesday, June 25, 2014
Infrastructure Development Volunteer Project for GVI Shimoni, Kenya
I volunteered for 4 weeks during May/June of 2014 with a UK
based NGO called GVI building latrines nearby Shimoni, a small village on the
southern coast of Kenya. Four latrines
total were built, one in each corner of the neighboring village to aid with hygiene
and sanitation initiatives since the village currently had no latrines nearby. In addition to construction, GVI also has
volunteers who work on health initiatives and community development with the
community (as well as forest and marine wildlife conservation projects.)
The village partnered with GVI by first digging the holes of
each latrine to a depth of about 20 feet, much of which was dug through the
solid coral rag rock characteristic of the area. Construction for the entire project was
completed over the course of about 5 weeks, usually with 3 volunteers and a
local “fundi” – the Swahili term for someone who is an expert in their trade.
A foundation was laid around each hole using pieces of coral rag and cement, followed by the floor which was a mix of coral gravel (hand-cut) and cement to create the concrete. With the base in place the walls were laid using coral bricks and cement. (Often the coral bricks were irregularly shaped and could be trimmed into blocks using a dull machete.) The roof and doors were constructed using several wood beams and tin sheets.
The materials and methods used for construction of the latrine were typical for almost any structure in Kenya. Many of the homes built with low cost materials would consist of a wood grid frame and mud bricks, sometimes using pieces of rock and a thatch roof. However more permanent and higher quality structures in various villages and the major cities are built using concrete and coral bricks. The bricks were sourced from one of several quarries along the coast, and the concrete also quarried in these areas and manufactured at one of the several major cement plants in Mombasa.
Hamisi (our fundi) squaring off the foundation. |
A foundation was laid around each hole using pieces of coral rag and cement, followed by the floor which was a mix of coral gravel (hand-cut) and cement to create the concrete. With the base in place the walls were laid using coral bricks and cement. (Often the coral bricks were irregularly shaped and could be trimmed into blocks using a dull machete.) The roof and doors were constructed using several wood beams and tin sheets.
The materials and methods used for construction of the latrine were typical for almost any structure in Kenya. Many of the homes built with low cost materials would consist of a wood grid frame and mud bricks, sometimes using pieces of rock and a thatch roof. However more permanent and higher quality structures in various villages and the major cities are built using concrete and coral bricks. The bricks were sourced from one of several quarries along the coast, and the concrete also quarried in these areas and manufactured at one of the several major cement plants in Mombasa.
Here is a short time-lapse video of the process of constructing
one of these units:
For more information about GVI, visit: http://www.gviusa.com/
Labels:
Africa,
Coral Rag,
GVI,
Infrastructure,
Kenya,
Public Health
Location:
Shimoni, Kenya
Subscribe to:
Posts (Atom)